FIRST AID
Faced with a large number of victims of a natural or man-made disaster or mass violence, an unprepared person, as a rule, does not know what to do. Even people trained in the basics of first aid can get confused when specific actions need to be taken. If you are lucky enough to survive a disaster or find yourself on the spot immediately after the events occurred, call 911 first, and then set the order of assistance to the injured.
Determine the degree of consciousness of the victims
Begin by determining the level of consciousness of the victims. State your name and then say, “I am here to help you. If you can, stand up and come over to me. If you can’t, raise your hand or shout.”
The injured, who can be treated on an outpatient basis, should receive assistance after those who are conscious but unable to walk on their own. The last thing in such a situation is to deal with those who are unconscious or do not react in any way to your attempts to establish contact with them.
If one of the wounded is bleeding, and the other is unconscious, the bleeding must first be stopped: this sequence of actions is most effective.
Although the first instinctive impulse may be the desire to rush to the victim, who is screaming loudly and asking for help, it must be assumed that if a person screams, then he can breathe. And next to him there may be another victim, who got a piece of a foreign body in his throat, due to which his brain suffers from acute hypoxia.
Use the ABC method
- Check if the victim responds to the sound of your voice.
- If not, prick the person to see if they can respond to sensory stimuli.
- If there is no reaction to your actions, the victim is unconscious.
When it is difficult to determine the order of assistance, rescuers resort to the so-called ABC method, named after the first letters of the words airways, breathing, circulation.
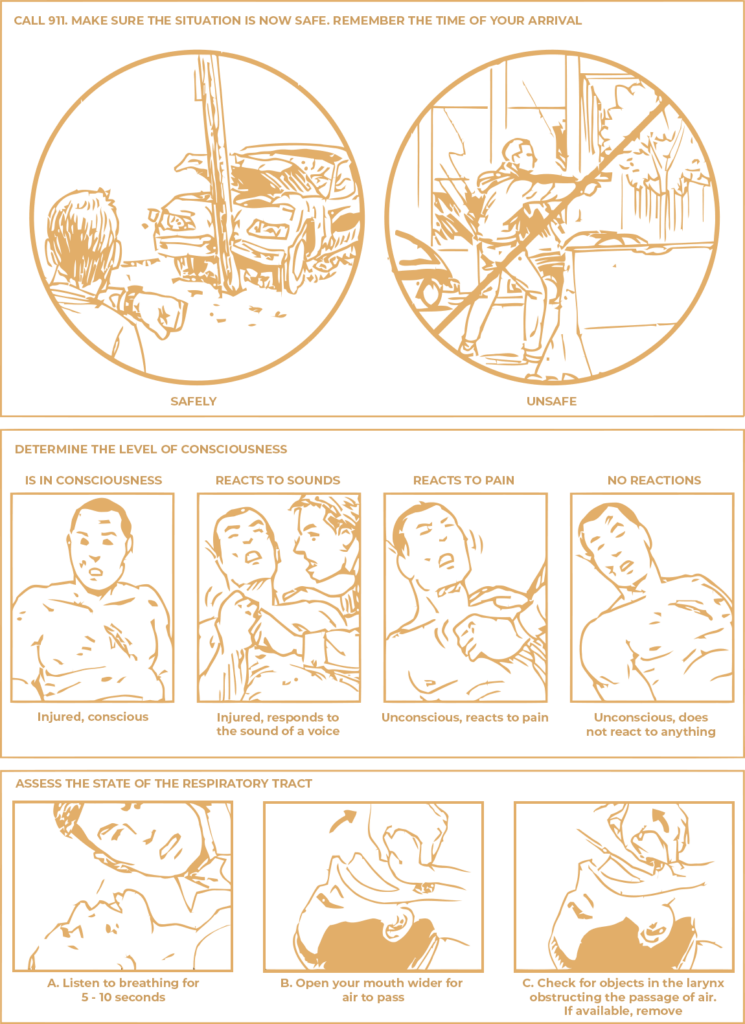
Assess the condition of the victim’s airways by listening for breathing. If breathing cannot be heard, open the casualty’s mouth and see if anything can be seen that could obstruct the flow of air. If you find any foreign objects, try to remove them carefully. If nothing is visible, try using your index finger to reach deep enough into the victim’s larynx to induce a vomiting reflex.
Then evaluate the breathing by observing how the lungs move. Is this happening synchronously, or is one side of the chest “lagging”? Place your ear to the victim’s chest and listen for the sounds of inhalation and exhalation of air from the chest cavity. At the same time, you can check the pulse by placing your index and middle fingers to the right and left of the protrusion of the victim’s larynx.
Feeling of the pulse in the neck area indicates good blood circulation, the pulse at the wrist indicates very good circulation, and the pulse on the back of the knee indicates excellent circulation.

After assessing the condition of the airways and lungs, engage in an assessment of blood circulation. Determine if the victim has serious injuries. Use pressure or a tourniquet to stop the bleeding.
Mouth-to-mouth breathing and artificial respiration can be used to resuscitate the victim, however, if there are many injured, the procedure for providing medical care should be followed. Therefore, people who arrive first at the scene of a disaster should not first provide assistance to those who are the least responsive to their signals.
By following protocol, more people can be helped and valuable information can be provided to first responders when they arrive at the scene.
Stopping bleeding
Seeing a person bleeding can cause panic, but your job is to prevent this from happening. Often the life of the victim depends on the speed of medical care. Anyone can stop blood loss, and this can be done using only hands.
The first method is direct pressure. Act quickly, especially if the blood is bright red: loss of arterial blood can very soon lead to functional failure of the damaged organ. Immediately place your hand, palm or back palm, directly on the wound and press down hard enough. Use your body weight. This is necessary in order to press the artery against the bone. If the victim is not yet on the ground, help him to lower and lie down. This way you don’t have to overcome the force of gravity.

If you cannot stop the blood loss by using direct pressure, try applying the same force to one of the control bleeding points. Pick a point just above the damage. If you do not see a place with a sharp slowdown in blood flow, try pressing on points that are located near the damaged vessel. If such a point is located on an area of the body with a large muscle mass or if the victim is overweight, use the palm or the back of the hand to put pressure on it.
If none of these methods stop the bleeding, resort to a tourniquet, which can be a shirt, pants, or belt. Bandage the limb above the wound as close to it as possible and as soon as possible hand over the victim to the medics for them to deal with. A tourniquet left for a long time can lead to tissue death, and this is fraught with limb amputation.
Once blood loss has been stopped, dress the wound and, if possible, position the victim so that the injured area is higher than the heart. Try to get him medical help immediately.
First aid for gunshot wounds
More than 70,000 people are shot and wounded each year in the United States alone. At the same time, most civilians do not know how to help the victim before the arrival of doctors or rescuers. If vital organs such as the brain, heart or lungs are damaged by the shot, death can occur even before medical intervention is attempted. Blood loss from other injuries, however, is preventable. To do this, use a direct pressure technique, indirect pressure technique, or a tourniquet.
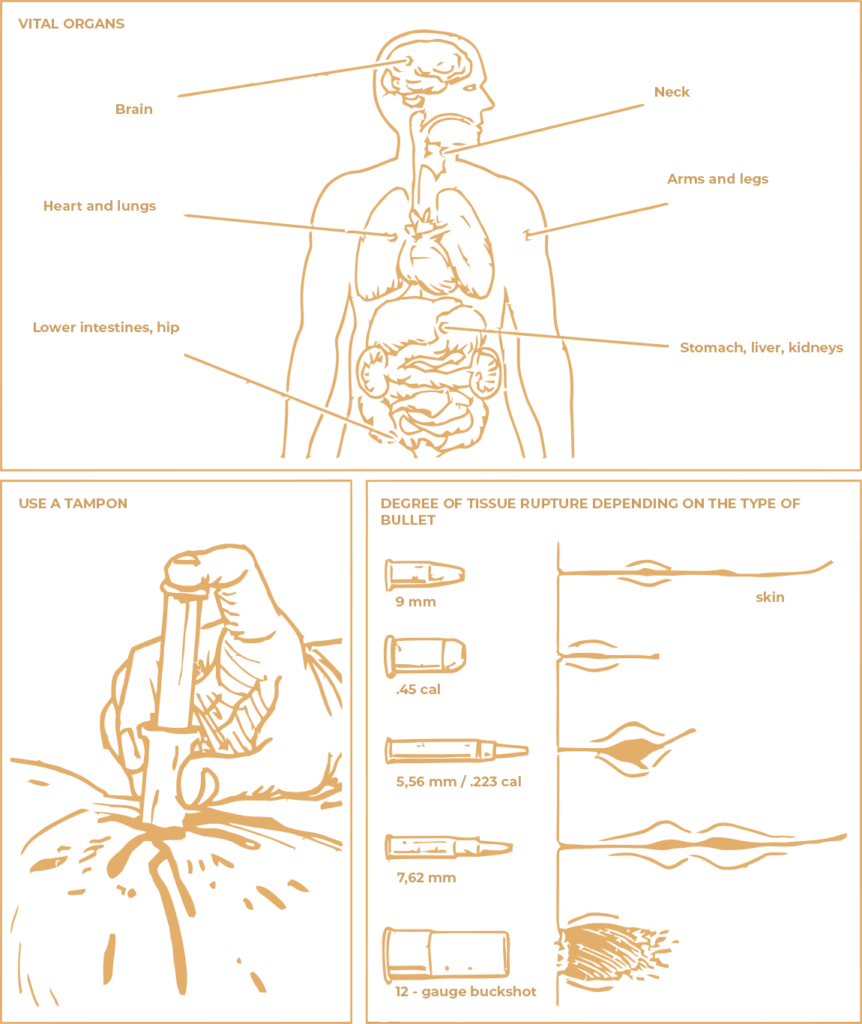
As a last resort, direct pressure can be combined with a shirt, medical tampon, or sanitary pad to slow bleeding. Feminine hygiene products are designed to absorb large amounts of blood. If you manage to insert such a tampon into the wound, it will lead to the formation of a blood clot where it flows.
The area of internal injury can be extensive, especially if the bullet has struck organs or arteries. In this case, being next to the victim, there is little that can be done, but something can still be done.
Try to find the bullet exit hole. This will control bleeding both at the point where the bullet enters and exits the body.
Be careful as the exit hole may not be where you expect them to be. Passing through the body, the bullet can ricochet, change its path in the internal cavities and move along the bone, because of which, if injured in the knee, the exit hole can be in the pelvic region.
Do not draw conclusions about the severity of the injury, based on the size of the wound. Of course, a 9 mm bullet does not cause as wide damage as a buckshot. But the flight speed of buckshot is much lower, which somewhat reduces the likelihood of a lethal outcome. Ultimately, it all depends on the location of the wound and the distance between the shooter and the victim.
Try to calm the victim. The injured are often in shock. Their blood pressure drops sharply as the body goes into energy-saving mode. Cover the injured person with a blanket to reduce heat loss. If there is even the slightest likelihood of spinal injury, do not try to move the victim to another location.
Stopping bleeding when wounded in the chest
Regardless of how the chest wound was received, the chest injury is extremely dangerous. With a wound in the heart area, an ordinary person can do little to help the victim, except to give him artificial respiration and call for help. While these injuries are not necessarily fatal, they require the professional action of a team of surgeons. But with a wound in the chest, because of which the lungs are endangered, a layman can temporarily cope, before the arrival of doctors.
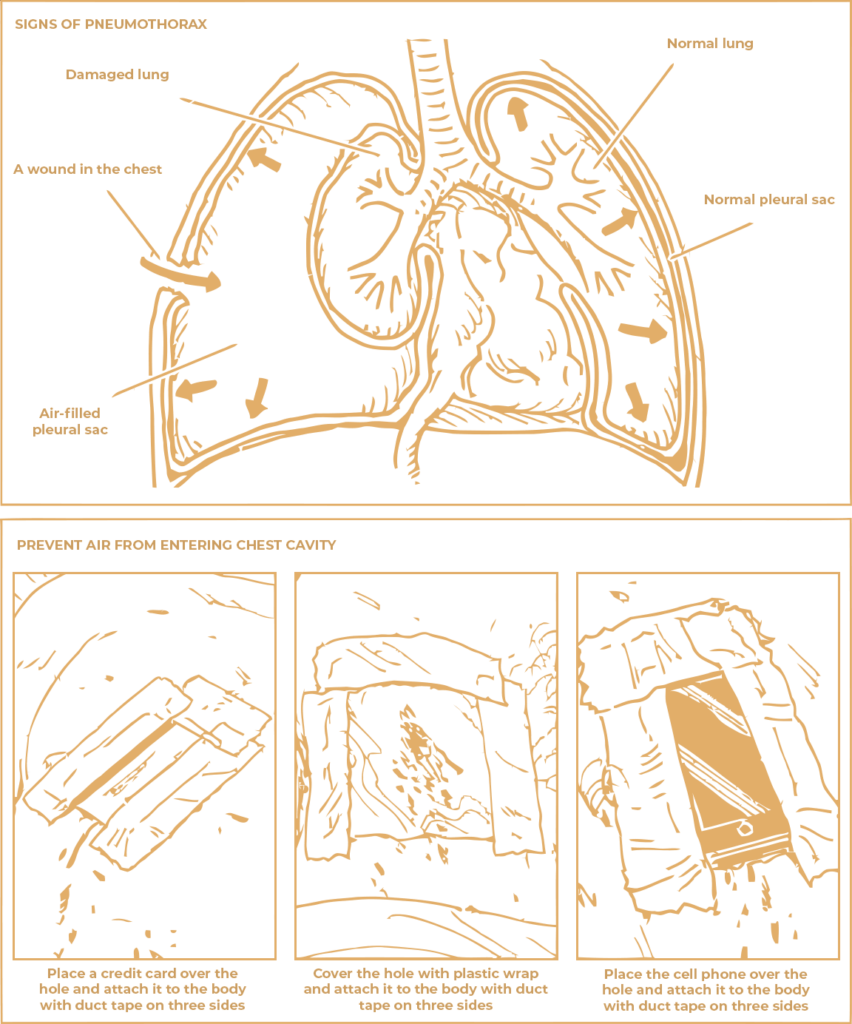
With a penetrating wound into the chest, the first thing to do is not to stop the bleeding, but to close the wound. This is necessary in order to prevent pneumothorax – the accumulation of air in the pleural cavity. The lungs are surrounded by pleural sacs – thin membranes that protect these organs from surrounding tissues and bones. If the pleura is damaged, air can enter the pleural sac through the wound and pressurize the lungs. With each breath you take, more air will flow through the wound, which makes it harder for the lungs to do their jobs.
Use flat, airtight materials to close the wound. Credit cards, plastic wrap, or even a phone will do. Attach them to the body with duct tape on three sides, leaving a kind of valve on the fourth side, through which air can escape, which is already inside the pleural sac. When the victim inhales, the expansion of the chest puts pressure on the covering material, thereby preventing air from entering the site of the penetrating wound.
Actions in case of foreign object penetrating wound
Never, under any circumstances, try to remove from the body a large foreign object that has penetrated deep enough and may have ended up near the main arteries, vessels or organs. Such an attempt can lead to even more serious tissue damage and only worsen the condition of the victim. If a foreign object has compromised the integrity of a vessel or artery, its removal may cause sudden and profuse bleeding. Even if a knife or other sharp object is stuck in the leg, which can happen, for example, in the kitchen, you should never pull it out of the wound right there, on the spot. This can only be done with the help of medical instruments and knowing exactly how to proceed.
If a person stumbles upon something large or an object fixed in place and if the necessary tools are available, it can be released. Rescuers have electric saws, so if you cannot safely free the victim, wait for help to arrive.
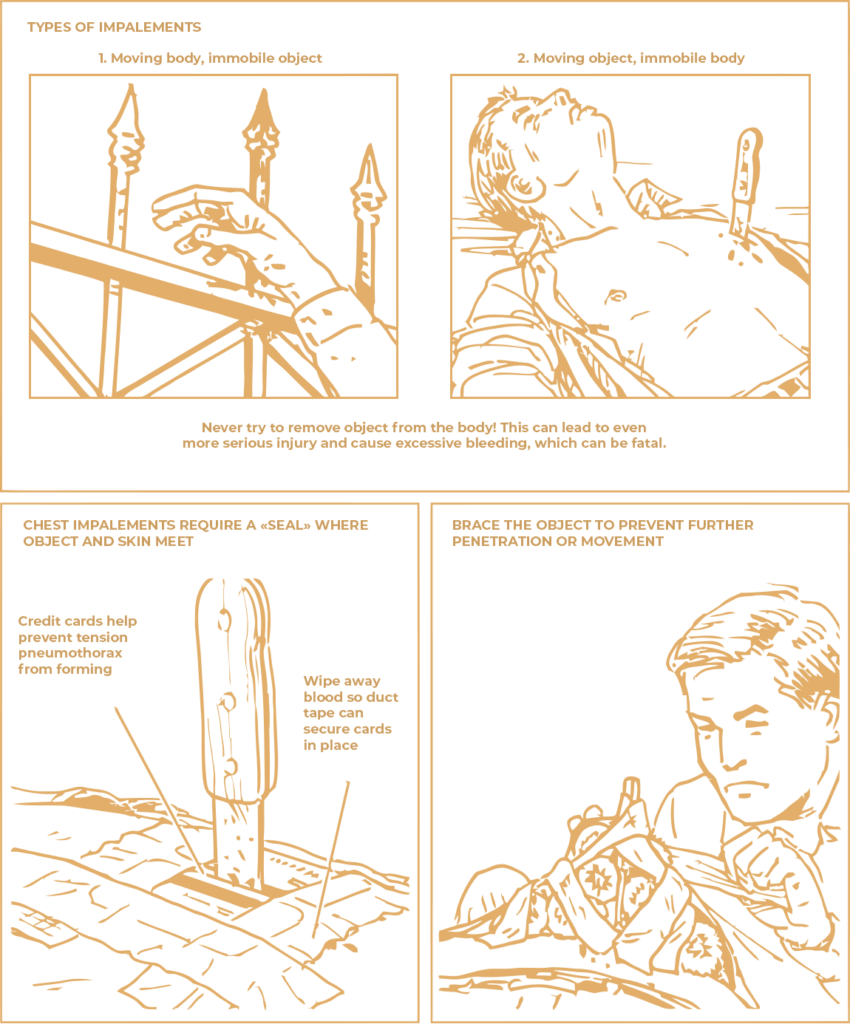
If a foreign object is near the chest cavity, the best thing to do is to call 911 and close the wound to keep air out. If the chest is damaged, there is a risk of puncture of the lung and pneumothorax, which is life-threatening.
Having closed the wound, the object stuck into the body should be fixed so that it does not move and does not penetrate even deeper inside. To do this, cover its protruding end with pieces of gauze or socks, laid on top of each other in the form of a pyramid, and then secure the resulting structure with adhesive tape.
Sewing up the wound
If the victim can be taken to the hospital within a few hours, then it is enough to clean the wound and bandage it tightly to prevent infection. But if you need to get to the nearest medical facility for more than a day, if you have the necessary materials, it is better to sewing up a wound longer than 7 mm with a temporary suture. However, don’t even try to do this, if the wound is dirty, crooked, crater-like, or very deep. These complex wounds require deep cleansing and possibly even a skin graft. Do not stitch up the wound if you cannot properly rinse it with boiled chilled water or alcohol. A closed, dirty wound will fester sooner than an open one.
Consider the location of the cut and its shape to determine which type of stitch to use.
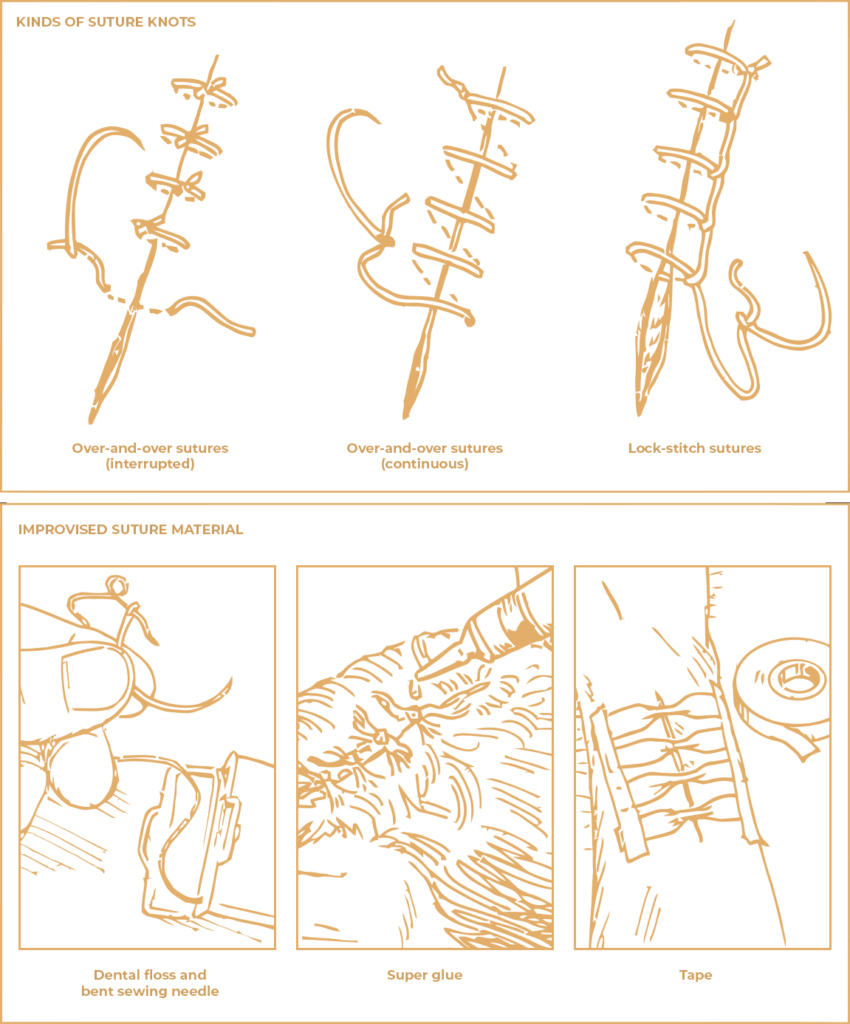
It will take quite a long time to make an interrupted suture. But on the other hand, this type of seam provides an airtight seal and can be used for stitching lacerated wounds. The fastest and easiest option is a continuous suture, but when using it, some areas of the wound may not be closed, and this suture itself will weaken over time. With a seam in the form of a non-opening loop, after each horizontal loop, the needle goes through the previous loop. This suture is more secure than continuous sutures, but usually leaves a scar behind.
Because the scalp is thin and tightly wrapped around the skull, stitches are difficult and sometimes impossible. Instead of a seam, you can use another option: tie the hair in bunches and glue the bunches to the wound.
You can do it without a needle by using medical tape. Secure it in the shape of a butterfly, squeezing in the center to better protect the part of the wound where the blood is oozing. The «butterfly wings» should be pressed against the skin and secured.
Burn treatment
If you’ve ever applied ice to a burn site, thinking that it will help, then you need to re-learn the rules on this subject: ice can cause frostbite in the area of recently burned skin, which greatly interferes with its further healing. In general, the same rules apply to different types of burns – thermal, chemical or electrical.
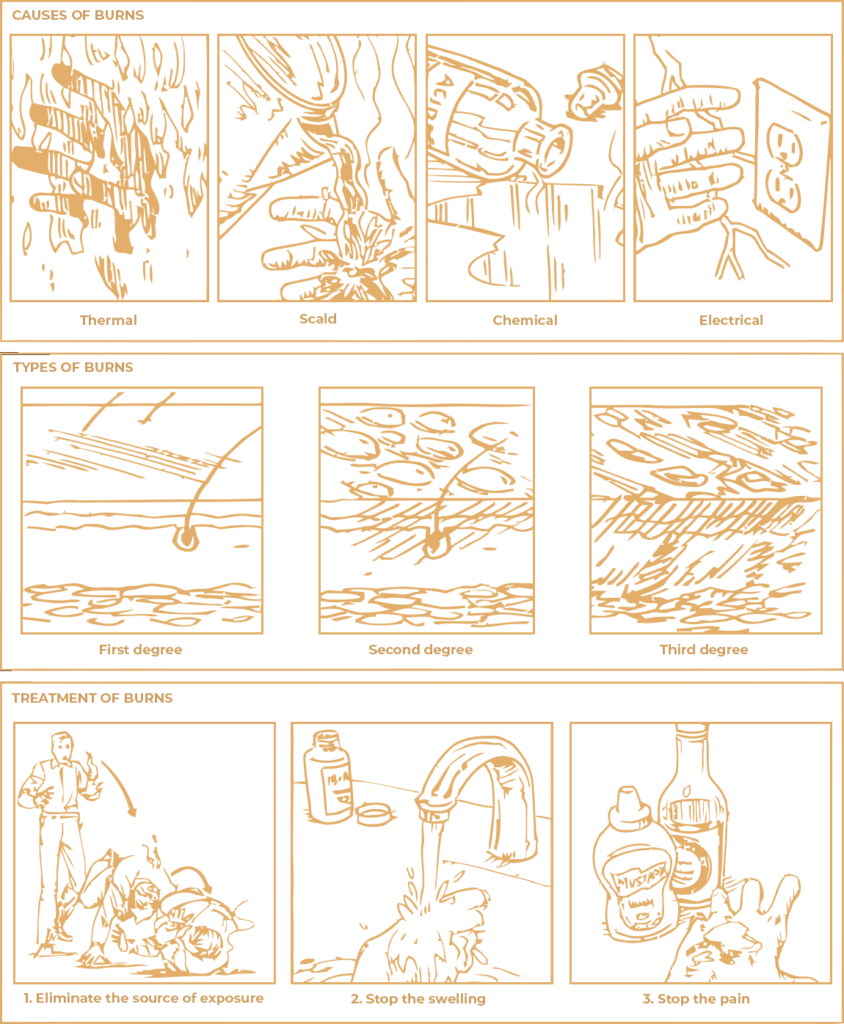
Second or third degree burns of any kind should be treated immediately. Second-degree burns affect the deeper layers of the skin, and third-degree burns can cause serious, irreversible damage to ligaments, tendons, bones and internal organs. In both cases, there is a high likelihood that the victims will develop a serious infection. Burns of internal organs (lungs, digestive system) should be dealt with by doctors. In any situation where a caustic substance enters the human body, you need to take it to a hospital or poison control center as soon as possible.
Chemical burns of the skin should also be treated immediately, although their symptoms may begin to manifest themselves only a few hours after exposure to the substance.
Only first-degree burns can be safely treated at home. Place the scalded area under cold water, then smear it with an antibiotic pain relieving ointment or time-tested home remedies like yellow mustard or soy sauce. to avoid infection, the burned area must be kept clean and dry.
Splint application for fracture
Many people get fractures in childhood, and although they are painful and slow to heal, they are usually not life-threatening. However, a fracture received far from civilization or medical institutions is fraught with fatal consequences.
If you need to get to the hospital on your own from your location, you can ease the pain. To do this, you need to put a splint on the broken limb. There is a more compelling reason to do this: when fixing the injured limb, the uneven edge of the broken bone will not affect the internal tissues and blood vessels. Violation of the integrity of the bone itself can already lead to significant blood loss, and in combination with damage to the vessels, it threatens life-threatening internal bleeding. For this reason, any fracture should be treated as soon as possible. The fracture site should not be subject to pressure.
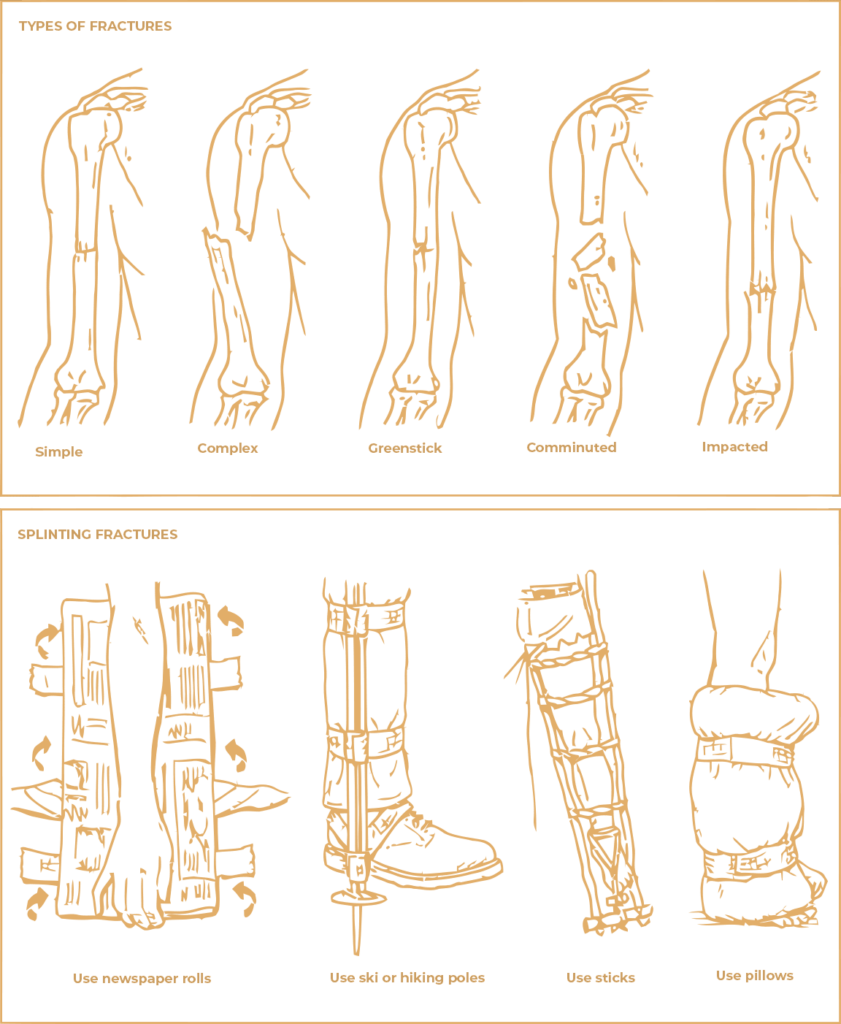
A splint is necessary to temporarily immobilize the broken bone. A hard object is glued or bandaged to the limb with a plaster, which provides immobility, – a “tire”. The bone must be fixed above and below the fracture site, from joint to joint. If the shin is injured, apply a splint from the ankle to the knee.
A variety of handy tools can be used as a temporary tire, including newspapers folded several times, skis, hiking and ordinary sticks, and even pillows.
After you align the limb with the help of the splint, additionally fix the site of injury with a plaster or tie the limb to the body: arms should be pressed to the body, legs – to each other. For a fractured femur, put your legs together by wrapping duct tape or tape around your thighs. In case of rib fractures, gently press the victim’s hand to the body from the side where the fracture is, and do not allow the patient to move, as in this case, the broken rib can puncture the lung.
Performing a conicotomy
As with many other types of emergency medical care, an untrained person should resort to a conicotomy to treat an injured person only as a last resort. An alternative airway should only be attempted when the victim has an airway injury due to serious injury such as a car accident, or if a foreign object has entered the airway and cannot be retrieved. To remove foreign bodies from the upper respiratory tract, the Heimlich method is used. This method is considered the most effective, since with a sharp impact directed under the diaphragm, a supply of air is forcefully pushed out of the lower lobes of the lungs, which is never used for breathing. Continue to attempt the Heimlich maneuver as long as the victim is gasping, choking, wheezing, or displaying any other audible breathing attempts.
When calling 911, describe to the operator the victim’s symptoms and perform a conicotomy just if the emergency dispatcher agrees that it is necessary.
When testing the effectiveness of a conicotomy by an unauthorized person at the accident site, 57% of second-year medical students who had no prior experience with airway surgery were able to successfully perform the necessary intervention on the simulator using only a scalpel and a ballpoint pen. This study suggests that while bystanders are likely to be significantly less likely to succeed in performing the same actions than medical professionals, the use of these tools does offer some hope in situations where the only alternative outcome is permanent brain damage or death.
Serious brain damage or complete death can occur in as little as three to seven minutes without oxygen, and therefore time is the most critical factor in airway problems.
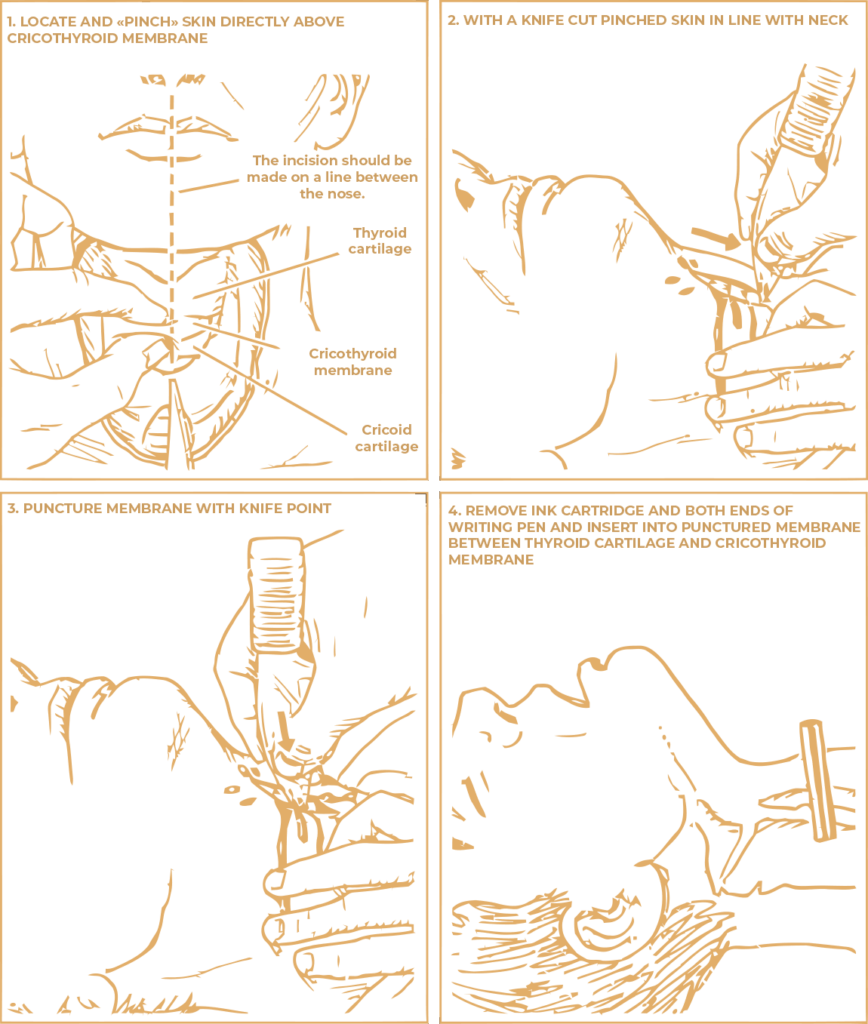
Start with the prompt preparation of the instruments. You will need a sharp knife to make the cut and a sturdy straw-like tube or pen barrel. The thicker the handle, the more likely its body will be able to act as a functioning airway. According to the results of special studies, it was found that the best option in this case is strong, large-diameter straws for bottles used by athletes. However, most of us are more likely to have a pen in our wallet or back pocket, and a situation in which the victim may soon die requires the use of the most appropriate one that is at hand.
If it suddenly turns out that there are endotracheal tubes in the first aid kit, then, of course, you need to use them. If you have to make do with a pen, remove and discard the cartridge and the top and bottom of the pen — you only need the body. Palpate the victim’s neck to find the Adam’s apple, a lump formed by the bend of the thyroid cartilage. If it is not visually noticeable, slide your fingers down the victim’s neck. The first solid protrusion is the Adam’s apple, and you want to aim for the space just below it—the cricothyroid membrane that connects the thyroid cartilage to the cricoid cartilage. After an initial cut through the skin, you’ll be punching through this membrane in order to clear a new pathway to the trachea.
The skin at the neck is very thin, which means that you need to be extremely careful in performing the initial cut. Slice too deep and you could be lacerating deeper layers of tissue and cartilage. The jugular veins and carotid arteries lie just to the side of the cervical vertebrae, so your cut must be centralized. Cut too low, and you’ll be slicing into the thyroid gland. To ensure that your first cut slices only through the skin, pinch the skin just below the Adam’s apple and pull it away from the throat. Make a perpendicular, quarter-inch horizontal cut in the loose skin.
Now through it you can see the elastic cone of the larynx. Use the tip of a knife to pierce the cone between the two rings of cartilage (thyroid and cricoid glands). All you have to do is a small, shallow cut; the system will work more efficiently if a secure seal is created around the breathing tube. Although some, usually small, amount of blood will appear, as a rule, this method does not lead to profuse bleeding.
Insert the shaft of a pen or endotracheal tube into the incision. To quickly check the airway, look for misting, feel for airflow, or suck in the air from the tube with your mouth to start the process. Help the victim take two to three breaths through the tube. If your intervention is successful, the victim should begin to breathe on their own through the created airway. If breathing does not resume and no pulse is felt, start artificial respiration.


